Guide
Managing Users and Permissions on Facebook
Adding Users:
Access Page Settings:
- Sign in to Facebook and navigate to the Page where you want to manage users.
- Click on the “Settings” tab located at the top right corner of the Page.
Navigate to Page Roles:
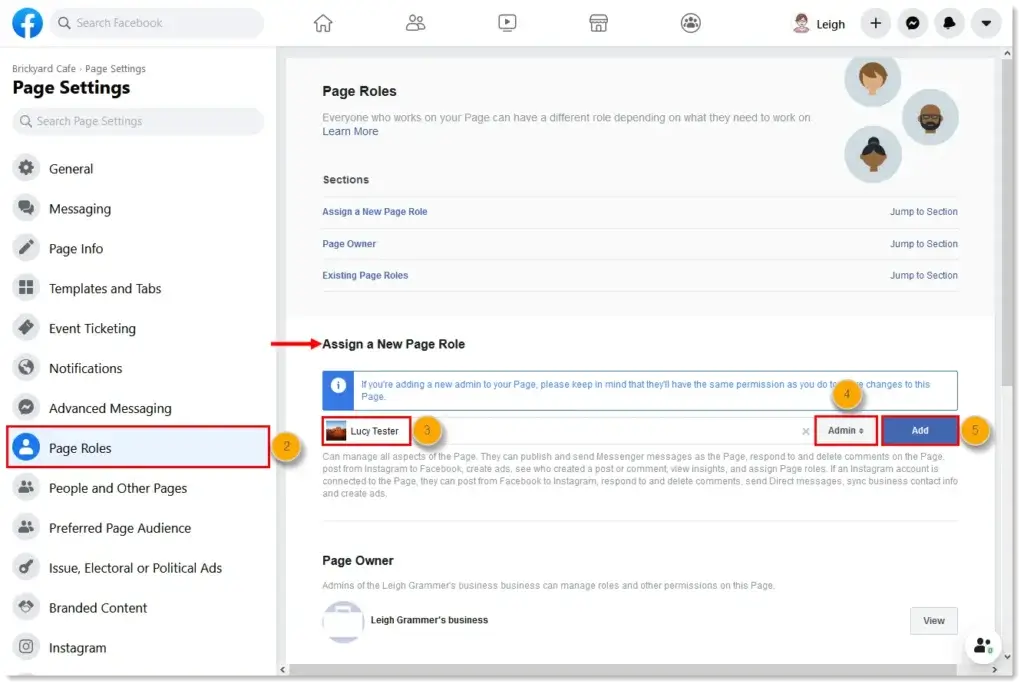
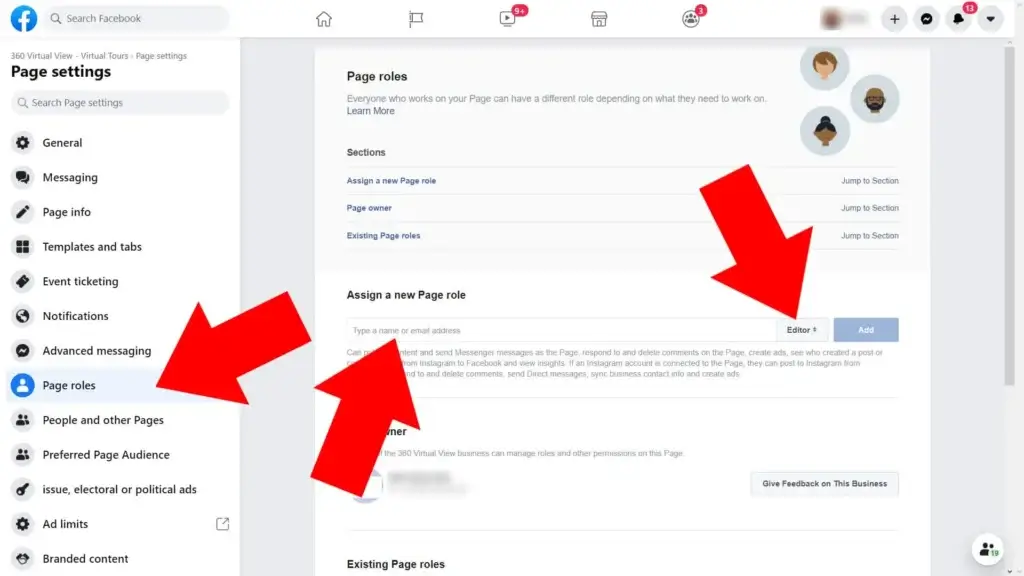
- In the Settings menu, select “Page Roles” from the list on the left-hand side.
Add a New User:
- Scroll down to the “Assign a New Page Role” section.
- Enter the email address or Facebook profile name of the person you want to add.
- Select the role you want to assign to the user (Admin, Editor, Moderator, etc.) from the dropdown menu.
Send Invitation:
- Click on the “Add” button to send an invitation to the user to become a member of your Page.
Removing Users:
Access Page Settings:
- Follow steps 1 and 2 from the “Adding Users” section to access Page Roles.
Locate User to Remove:
- Scroll down to the list of current Page roles.
- Find the user you want to remove.
Remove User:
- Click on the “Edit” button next to the user’s name.
- Select “Remove” from the dropdown menu.
- Confirm the removal by clicking “Confirm.”
Adjusting Permissions:
Access Page Settings:
- Follow steps 1 and 2 from the “Adding Users” section to access Page Roles.
Modify User Roles:
- Locate the user whose permissions you want to change.
- Click on the dropdown menu next to their name.
- Select the new role from the available options.
Save Changes:
- Click on the “Save Changes” button to apply the modified permissions.
Managing Page Access in the Facebook Brower Login
If you have full control of a Facebook Page, you can easily manage access for individuals or teams. Here's a step-by-step guide:
- Logging In:
- Open your web browser and go to Facebook.
- Log in with your credentials.
- Accessing Your Page:
- Click on your profile photo in the top right corner.
- Select “See all profiles.”
- Choose the Page you want to manage.
- Navigating to Page Management:
- Click on your Page’s profile picture in the top right to go to your Page.
- Click “Manage” and then select “Page access” on the left below Your tools.
- Adding Facebook Access:
- Next to People with Facebook access, click “Add New.”
- Enter the person’s name or email.
- Choose between full or partial control.
- To give partial control, scroll down and click “Give Access.”
- To give full control, click to allow full control and then click “Give Access.”
- Enter your Facebook password and click “Confirm.”
- Task Access Management:
- For task access (outside Facebook), click “Add New” next to People with task access.
- Enter the person’s name or email and select the features they should manage.
- Click “Give Access” and confirm with your Facebook password.
- Editing Access:
- To edit access, click “Edit access” next to the person.
- Adjust the features and click “Update Access.”
- Confirm with your Facebook password.
- Removing Access:
- Next to the person you want to remove, click “more” and then “Remove from Page.”
- The person will be notified via email.
Managing Page Access in the Facebook iPhone App
If you have full control of a Facebook Page, you can easily manage access for individuals or teams using the iPhone app. Here's a step-by-step guide:
- Accessing Your Page:
- Open the Facebook app on your iPhone.
- Tap the Menu icon at the bottom or your profile picture.
- Select your Page. You may need to use “Switch profile” or “Select profile” and then tap your Page.
- Navigating to Page Management:
- Tap the Menu icon at the bottom right.
- Tap “Settings and privacy,” then tap “Settings.”
- Under “Page settings,” tap “Page access” below New Pages experience.
- Adding Facebook Access:
- Tap “Add new” next to “People with Facebook access.”
- Tap “Next,” type the name or email of the person.
- Choose between full or partial control.
- To give partial control, scroll down and tap “Give Access.”
- To give full control, tap to allow full control and then tap “Give Access.”
- Enter your Facebook password and tap “Confirm.”
- Task Access Management:
- For task access, tap “Add new” next to “People with task access.”
- Type the name or email and tap “Next.”
- Enter your Facebook password and tap “Confirm.”
- Editing Access:
- To edit access, tap “more” next to the person.
- Tap “Edit access” and choose the features to manage.
- Tap “Update Access” and confirm with your Facebook password.
- Removing Access:
- To remove access, tap “more” next to the person.
- Tap “Remove from Page,” and the person will be notified via email.
Managing Page Access in the Facebook iPad App
If you have full control of a Facebook Page, you can easily manage access for individuals or teams using the iPad app. Here's a step-by-step guide:
- Accessing Your Page:
- Open the Facebook app on your iPad.
- Tap the menu icon or your profile picture at the bottom.
- Selecting Your Page:
- Tap then select the Page you want to manage.
- Navigating to Page Management:
- Tap “Settings and privacy,” then tap “Settings.”
- Under “Page settings,” tap “Page access” below New Pages experience.
- Adding Facebook Access:
- Tap “Add new” next to “People with Facebook access.”
- Tap “Next,” type the name or email of the person.
- Choose between full or partial control.
- To give partial control, scroll down and tap “Give Access.”
- To give full control, tap to allow full control and then tap “Give Access.”
- Enter your Facebook password and tap “Confirm.”
- Task Access Management:
- For task access, tap “Add new” next to “People with task access.”
- Type the name or email and tap “Next.”
- Enter your Facebook password and tap “Confirm.”
- Editing Access:
- From your Page, tap , then tap .
- Tap “more” next to the person.
- Tap “Edit access” and choose the features to manage.
- Tap “Update Access” and confirm with your Facebook password.
- Removing Access:
- From your Page, tap , then tap .
- Next to the person you want to remove, tap “more,” then tap “Remove from Page.”
- The person will be notified via email.
Managing Page Access in the Facebook Android App
If you have full control of a Facebook Page, you can efficiently manage access for individuals or teams using the Android app. Here's a step-by-step guide:
- Accessing Your Page:
- Open the Facebook app on your Android device.
- Tap “More” or your profile picture at the top.
- Selecting Your Page:
- Tap, then select the Page you want to manage.
- Navigating to Page Management:
- Tap at the top, then tap “Page access” below Tools.
- Adding Facebook Access:
- Tap “Add new” next to “People with Facebook access.”
- Tap “Next,” type the name or email of the person.
- Choose between full or partial control.
- To give partial control, scroll down and tap “Give Access.”
- To give full control, tap to allow full control and then tap “Give Access.”
- Enter your Facebook password and tap “Confirm.”
- Task Access Management:
- For task access, tap “Add new” next to “People with task access.”
- Type the name or email and tap “Next.”
- Enter your Facebook password and click “Confirm.”
- Editing Access:
- Tap at the top, then tap “Page access” below Tools.
- Tap “more” next to the person you want to edit access for.
- Tap “Edit access” and choose the features to manage.
- Tap “Update access” and confirm with your Facebook password.
- Removing Access:
- Tap at the top, then tap “Page access” below Tools.
- Next to the person you want to remove, tap “more,” then tap “Remove from Page.”
- The person will receive an email notifying them of the removal.
Managing Page Access in the Facebook Mobile Browser App
If you have full control of a Facebook Page, efficiently manage access for individuals or teams using the Mobile Browser App. Here's a step-by-step guide:
- Accessing Your Page:
- Open your mobile browser and log in to Facebook.
- Switch to Your Page:
- Click your Page’s profile picture in the top right to go to your Page.
- Navigating to Page Management:
- Click “Manage,” then tap “Page access” on the left below Your tools.
- Adding Facebook Access:
- Next to “People with Facebook access,” click “Add New.”
- Click “Next,” type the name or email of the person.
- Choose between full or partial control.
- To give partial control, scroll down and click “Give Access.”
- To give full control, click to allow full control, then click “Give Access.”
- Enter your Facebook password and click “Confirm.”
- Task Access Management:
- For task access, next to “People with task access,” click “Add New.”
- Click “Next,” type the name or email of the person.
- Click to select the features to manage, then click “Give Access.”
- Enter your Facebook password and click “Confirm.”
- Editing Access:
- Next to the person you want to edit access for, click “more,” then click “Edit access.”
- Click or to select the features to manage, then click “Update access.”
- Enter your Facebook password and tap “Confirm.”
- Removing Access:
- Next to the person you want to remove, click “more,” then click “Remove from Page.”
- The person will receive an email notifying them of the removal.
Managing Page Access in Facebook Lite App
If you have full control of a Facebook Page, efficiently manage people's access using the Facebook Lite app. Here's a step-by-step guide:
- Accessing Your Page:
- Open the Facebook Lite app and log in.
- Switch to Your Page:
- Tap the three horizontal lines in the top-right corner.
- Select the Page you want to manage.
- Navigating to Page Management:
- Tap “Manage,” then tap “Page access” below Your tools.
- Adding Facebook Access:
- Next to “People with Facebook access,” tap “Add New.”
- Tap “Next,” type the name or email of the person.
- Choose between full or partial control.
- To give partial control, scroll down and tap “Give Access.”
- To give full control, tap to allow full control, then tap “Give Access.”
- Enter your Facebook password and tap “Confirm.”
- Task Access Management:
- For task access, next to “People with task access,” tap “Add New.”
- Tap “Next,” type the name or email of the person.
- Tap to select the features to manage, then tap “Give Access.”
- Enter your Facebook password and tap “Confirm.”
- Editing Access:
- Next to the person you want to edit access for, tap “more,” then tap “Edit access.”
- Tap or to select the features to manage, then tap “Update access.”
- Enter your Facebook password and tap “Confirm.”
- Removing Access:
- Next to the person you want to remove, tap “more,” then tap “Remove from Page.”
- The person will receive an email notifying them of the removal.
Analytics
Add, edit, and delete users and user groups
Manage the list of users who have access to your Analytics account.
Add users
You can add as many users as you need. To add a new user to an account/property/view:
- Sign in to Google Analytics.
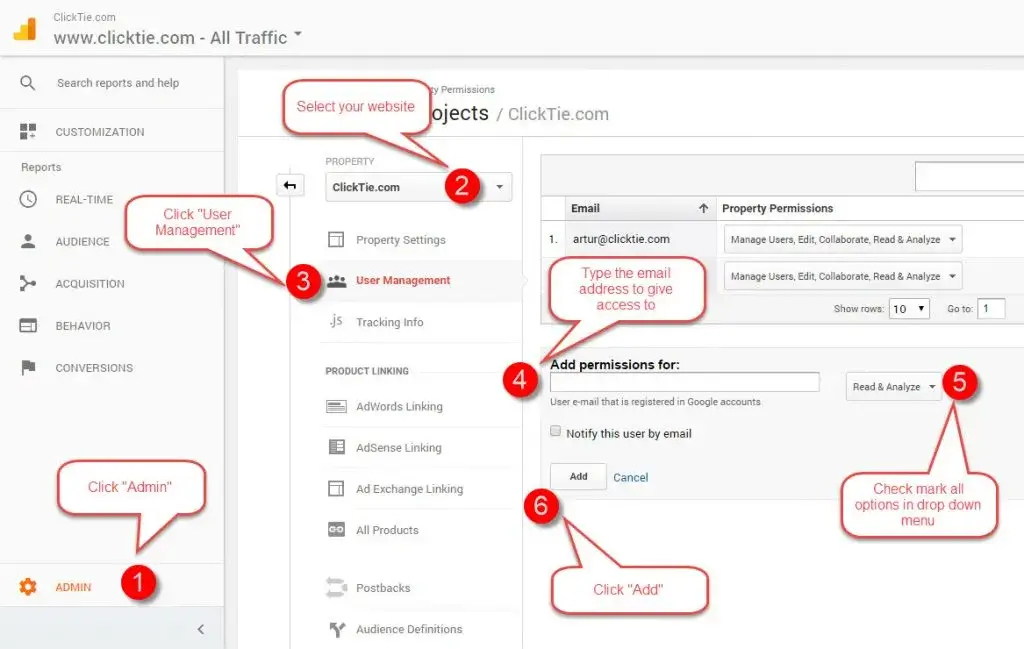
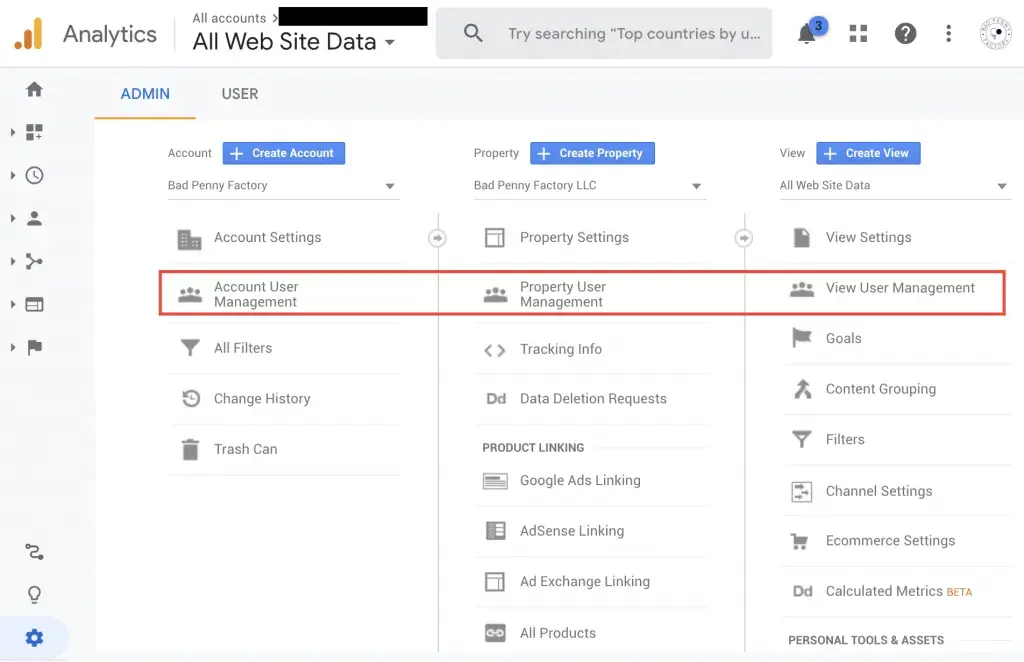
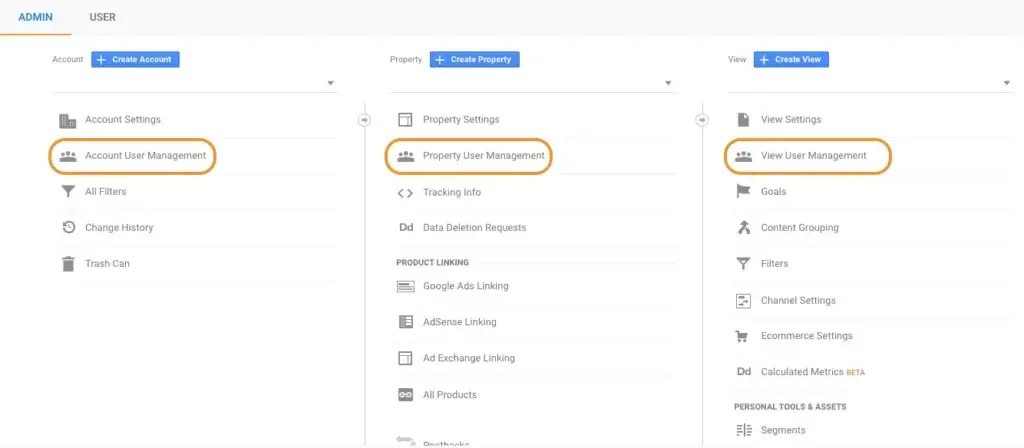
- Click Admin , and navigate to the desired account/property/view.
- In the Account, Property, or View column (depending upon whether you want to add users at the account, property, or view level), click Access Management.
- In the Account permissions list, click +, then click Add users.
- Enter the email address for the user’s Google Account.
- Select Notify new users by email to send a message to the user. Select the permissions you want. Learn more about permissions.
- Click Add.
Edit users
To modify permissions for an existing user:
- Sign in to Google Analytics.
- Click Admin, and navigate to the desired account/property/view.
- In the Account, Property, or View column (depending upon whether you want to modify permissions at the account, property, or view level), click Access Management.
- Use the search box at the top of the list to find the user you want. Enter a full or partial address ( e.g., [email protected] or janedoe).
- Click the username, then add or remove permissions.
- Click Save.
Delete users
To delete a user:
- Sign in to Google Analytics..
- Click Admin, and navigate to the desired account.
- In the Account, Property, or View column, click Access Management.
- Use the search box at the top of the list to find the user you want. Enter a full or partial address( e.g., [email protected] or janedoe).
- Select the check box for each user you want to delete, then click REMOVE.
Create user groups
To create a user group:
- Sign in to Google Analytics..
- Click Admin, and navigate to the desired account/property/view.
- In the Account, Property, or View column (depending upon whether you want to add the group at the account, property, or view level), click Access Management.
- In the users list, click +, then click Add user groups.
- Click Add group.
- click +, enter a name and description for the group, then click CREATE.
- Select the permissions you want, then click ADD. (Learn more about access management.)
Add users to a group
To add users to a group:
- Sign in to Google Analytics.
- Click Admin, and navigate to the desired account/property/view.
- In the Account, Property, or View column (depending upon whether you want to modify permissions at the account, property, or view level), click User Management.
- Use the search box at the top of the list to find the user group you want. Enter a full or partial group name.
- In the row for that group, click , then click View group’s organization details.
- Click Members, then click +.
- Enter the email addresses of the users you want to add.
- If you want to add other groups to this group, click ADD GROUP.
- After you have added the users and groups you want, click ADD.
- Close the Members panel, and close the panel for the group.
- Click Save.
Add a user group to a level of your Analytics hierarch
After you create a user group, you can add and remove users, groups, and permissions; and you can add the group to other groups.
To edit a user group:
- Sign in to Google Analytics..
- Click Admin, and navigate to the desired account/property/view.
- In the Account, Property, or View column, click Access Management.
- Use the search box at the top of the list to find the user group you want. Enter a full or partial group name.
- In the row for that group, click , then click View group’s organization details.
- To add users or user groups, click Members, then click +. After you add members, click ADD.
- To add the group to other groups, click Group memberships, then click +. After you choose groups, click DONE.
- To give the group permissions for other levels of your Analytics hierarchy (properties, views):
- Click Analytics.
- Expand the hierarchy, and click for each level where you want to modify permissions.
- Select the permissions you want to add, then click SAVE.
Use the same procedure to remove users from the group, remove the group from other groups, or to modify permissions.
Google Search Console
Managing Owners, Users, and Permissions in Google Search Console
Managing Owners:
- Sign in to Google Search Console:
- Visit the Google Search Console website and log in using your Google account credentials.
- Access Property Settings:
- In the Search Console dashboard, select the property you want to manage. Click on the gear icon (Settings) in the navigation menu.
- Navigate to Owners:
- In the left sidebar, find and click on “Owners.”
- Add or Remove Owners:
- To add a new owner, click on “Add an owner” and enter their email address. To remove an owner, click on the three dots next to their name and select “Remove owner.”
Managing Users:
- Access Property Settings:
- Follow steps 1 and 2 from the “Managing Owners” section.
- Navigate to Users and Permissions:
- In the left sidebar, click on “Users and permissions.”
- Add a New User:
- Click on the blue “+” button. Enter the email address of the new user and assign the appropriate permission level (Full, Restricted, or View only).
- Adjust Permission Levels:
- To modify permission levels, click on the user’s email address. Choose the desired permission level and save changes.
Managing Permissions:
- Access Property Settings:
- Follow steps 1 and 2 from the “Managing Owners” section.
- Navigate to Users and Permissions:
- In the left sidebar, click on “Users and permissions.”
- Modify Permission Levels:
- Click on the user whose permissions you want to change. Adjust the permission level accordingly (Full, Restricted, or View only).
- Remove Users:
- To remove a user, click on the three dots next to their email address and select “Remove.”
Bing Webmaster Tools
Managing Owners, Users, and Permissions in Google Search Console
Managing Owners:
- Sign in to Bing Webmaster Tools:
- Visit the Bing Webmaster Tools website and log in using your Microsoft account credentials.
- Access Site Settings:
- In the Webmaster Tools dashboard, select the website you want to manage. Click on “Configure My Site” and choose “Owners.”
- Add or Remove Owners:
- To add a new owner, enter their email address and click “Add.” To remove an owner, click on the trash bin icon next to their name.
Managing Users:
- Access Site Settings:
- Follow steps 1 and 2 from the “Managing Owners” section.
- Navigate to Users and Permissions:
- In the Webmaster Tools dashboard, click on “Users” under “Configure My Site.”
- Add a New User:
- Click “Add a user” and enter the new user’s email address. Assign the appropriate role (Owner, Contributor, or Viewer).
- Adjust Roles:
- To modify a user’s role, click on their email address. Choose the desired role (Owner, Contributor, or Viewer) and save changes.
Managing Permissions:
- Access Site Settings:
- Follow steps 1 and 2 from the “Managing Owners” section.
- Navigate to Users and Permissions:
- Follow steps 1 and 2 from the “Managing Users” section.
- Modify User Roles:
- Click on the user whose roles you want to change. Adjust the role accordingly (Owner, Contributor, or Viewer).
- Remove Users:
- To remove a user, click on the trash bin icon next to their email address.
Google Tag Manager
Managing Users and Permissions in Google Tag Manager
Managing Users:
- Access Google Tag Manager:
- Sign in to your Google Tag Manager account using your Google credentials.
- Navigate to the Admin Section:
- In the main dashboard, click on the “Admin” tab located at the top.
- Select Account, Container, or Workspace:
- Depending on where you want to add a user, select the Account, Container, or Workspace.
- Click on “User Management”:
- Under the selected Account, Container, or Workspace, find and click on “User Management.”
- Add a New User:
- Click on the “+” icon to add a new user. Enter their email address and select the desired permissions (Read, Edit, Approve).
- Remove or Edit Users:
- To remove or modify a user, click on their email address in the user list. Adjust permissions or click the trash bin icon to remove.
Managing Permissions:
- Access Google Tag Manager:
- Follow steps 1 and 2 from the “Managing Users” section.
- Navigate to the Admin Section:
- Follow step 3 from the “Managing Users” section.
- Select Account, Container, or Workspace:
- Depending on where you want to manage permissions, select the Account, Container, or Workspace.
- Click on “User Management”:
- Under the selected Account, Container, or Workspace, find and click on “User Management.”
- Modify User Permissions:
- Click on the user whose permissions you want to change. Adjust their permissions accordingly (Read, Edit, Approve).
- Remove Users:
- To remove a user, click on the trash bin icon next to their email address.
Business Profile
Adding and Removing Owners and Managers for Your Business Profile
Adding Owners and Managers:
- Access Business Profile Settings:
- Log in to your Business Profile on the respective platform.
- Navigate to Settings:
- Locate the settings or configuration section of your Business Profile.
- Access User Management:
- Look for options related to user management, typically found under “Account Settings” or “Profile Settings.”
- Select “Add User” or Similar:
- Click on the option to add a new user or team member to your Business Profile.
- Enter User Details:
- Fill in the required information for the user, such as their email address or username associated with the platform.
- Assign Role:
- Choose the appropriate role for the user, such as owner or manager. Owners typically have full control, while managers may have restricted access.
- Confirm and Save Changes:
- Review the details entered and confirm the addition of the new owner or manager. Save changes to apply the updates.
Removing Owners and Managers:
- Access User Management:
- Follow steps 1-3 from the “Adding Owners and Managers” section to access user management settings.
- Locate User to Remove:
- Identify the owner or manager you wish to remove from the list of users associated with your Business Profile.
- Select “Remove” or Similar:
- Click on the option to remove the user from your Business Profile. This action may be labeled as “Remove User” or similar.
- Confirm Removal:
- Confirm the removal of the user from your Business Profile. Some platforms may require additional confirmation steps.
- Save Changes:
- Once confirmed, save the changes to apply the removal of the owner or manager from your Business Profile.
Managing Users and Permissions on LinkedIn
Adding Users:
Access Admin Tools:
- Sign in to your LinkedIn account and navigate to your company page.
- Click on the “Admin tools” dropdown menu located at the top right corner of the page.
Select “Page Admins”:
- From the dropdown menu, choose “Page admins” to access the admin settings for your company page.
Click “Invite”:
- In the “Page admins” section, click on the “Invite” button to add a new user.
Enter User’s Email:
- Enter the email address of the user you want to add as an admin for your company page.
Assign Admin Role:
- Choose the appropriate admin role for the user, such as “Super Admin” or “Content Admin.”
Send Invitation:
- Click on the “Send invitation” button to send an invitation to the user to become an admin for your company page.
Removing Users:
Access Admin Tools:
- Follow steps 1 and 2 from the “Adding Users” section to access the admin settings for your company page.
Locate User to Remove:
- Scroll down to the list of admins and locate the user you want to remove.
Click “Remove”:
- Next to the user’s name, click on the “Remove” button to revoke their admin privileges.
Confirm Removal:
- Confirm the removal of the user as an admin for your company page.
Managing Permissions:
Access Admin Tools:
- Follow steps 1 and 2 from the “Adding Users” section to access the admin settings for your company page.
Adjust Admin Roles:
- Review the list of admins and their roles.
- Click on the “Edit” button next to each admin to adjust their permissions if necessary.
Save Changes:
- Once you have made the necessary adjustments, click on the “Save changes” button to apply the new permissions.
Managing Users and Permissions on Instagram
Managing Users:
- Access Instagram:
- Log in to your Instagram account using your credentials.
- Navigate to Account Settings:
- Click on your profile picture in the bottom right, then tap on the three horizontal lines in the top right. Select “Settings.”
- Access Account Permissions:
- Under “Settings,” tap on “Security,” then choose “Account Permissions.”
- Add a New User:
- Tap on “Add Account” to add a new user. Enter their username or email and set the desired access level (Admin or Editor).
- Remove or Modify Users:
- To remove or modify a user, navigate to “Account Permissions,” select the user, and choose “Remove” or adjust their access level.
Managing Permissions:
Access Instagram:
- Log in to your Instagram account using your credentials.
Navigate to Account Settings:
- Follow steps 2 and 3 from the “Managing Users” section.
Access Account Permissions:
- Under “Settings,” tap on “Security,” then choose “Account Permissions.”
Modify User Permissions:
- Tap on the user whose permissions you want to change. Adjust their access level (Admin or Editor).
Remove Users:
- To remove a user, select the user from “Account Permissions” and choose “Remove.”
TikTOk
Managing Users and Permissions on TikTok
Adding Users:
Access TikTok Account:
- Open the TikTok app on your mobile device and log in to your account.
Navigate to Settings:
- Tap on your profile icon located at the bottom right corner of the screen to access your profile.
Access Account Settings:
- In your profile, tap on the three horizontal dots (More) to access the settings menu.
Select “Manage Account”:
- Scroll down and select the “Manage Account” option from the settings menu.
Tap “Add Manager”:
- Under the “Account Management” section, tap on the “Add Manager” option.
Enter User’s TikTok Username:
- Enter the TikTok username of the user you want to add as a manager for your account.
Confirm Manager Role:
- Choose the appropriate role for the user, such as “Manager” or “Content Contributor.”
Send Invitation:
- Tap on the “Send Invitation” button to send an invitation to the user to become a manager for your account.
Removing Users:
Access Account Settings:
- Follow steps 1 to 4 from the “Adding Users” section to access the account management settings.
Locate User to Remove:
- Scroll down to the list of managers and locate the user you want to remove.
Tap “Remove”:
- Next to the user’s name, tap on the “Remove” button to revoke their manager privileges.
Confirm Removal:
- Confirm the removal of the user as a manager for your account.
Managing Permissions:
Access Account Settings:
- Follow steps 1 to 4 from the “Adding Users” section to access the account management settings.
Adjust Manager Roles:
- Review the list of managers and their roles.
- Tap on the user’s name to adjust their permissions if necessary.
Save Changes:
- Once you have made the necessary adjustments, tap on the “Save Changes” button to apply the new permissions.
YouTube
Managing Users and Permissions on YouTube
Adding Users:
Access YouTube Studio:
- Sign in to your YouTube account and navigate to YouTube Studio by clicking on your profile icon and selecting “YouTube Studio.”
Navigate to Settings:
- In YouTube Studio, click on the settings icon (gear icon) located in the bottom left corner of the screen.
Access Permissions Settings:
- From the settings menu, select “Permissions” under the “Channel” section.
Click “Invite New Users”:
- In the “Permissions” settings, click on the “Invite New Users” button.
Enter User’s Email Address:
- Enter the email address of the user you want to add as a manager or editor for your channel.
Select Role:
- Choose the appropriate role for the user, such as “Manager” or “Editor,” from the dropdown menu.
Send Invitation:
- Click on the “Invite” button to send an invitation to the user to become a manager or editor for your channel.
Removing Users:
Access Permissions Settings:
- Follow steps 1 to 3 from the “Adding Users” section to access the permissions settings for your channel.
Locate User to Remove:
- Scroll down to the list of users with access to your channel and locate the user you want to remove.
Click “Remove”:
- Next to the user’s name, click on the “Remove” button to revoke their access to your channel.
Confirm Removal:
- Confirm the removal of the user from your channel.
Managing Permissions:
Access Permissions Settings:
- Follow steps 1 to 3 from the “Adding Users” section to access the permissions settings for your channel.
Adjust User Roles:
- Review the list of users and their roles.
- Click on the user’s role to change it if necessary.
Save Changes:
- Once you have made the necessary adjustments, click on the “Save” button to apply the changes to user permissions.
